Roadster terminé (Roadster completed) - Cliquer sur l'image :

Roadster terminé (Roadster completed) - Cliquer sur l'image :
5 octobre 2014

vendredi 19 avril 2013

Removing the Gearbox last flange

The cheapest propshaft I have been proposed will come with the round differential mounting flange on the gearbox side too. It will certainly look like that:

 
It appears (according to Bob (Robo) on the Haynes and Roadsterbuilders forums), that the Fort Transit MT75 gearbox comes with this kind of flange instead of the 3 bolt flange I have on mine.

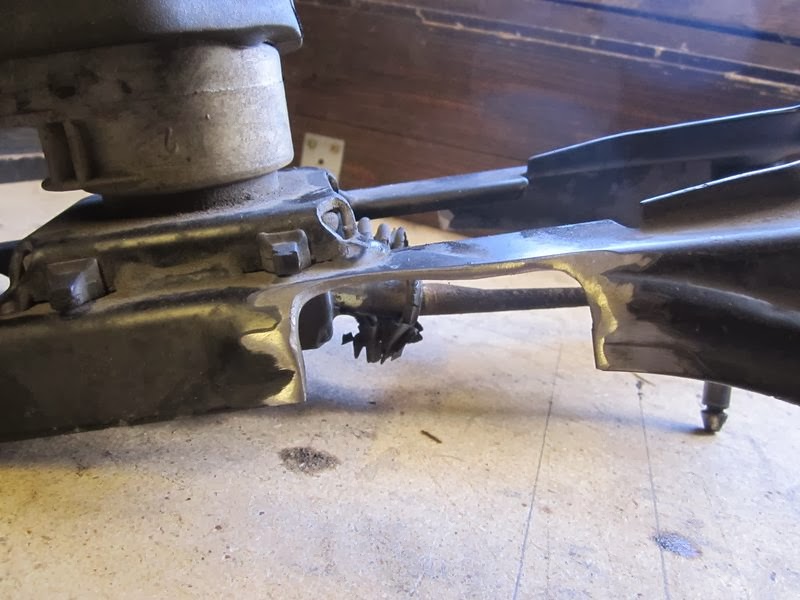
(3 bolt flange on my MT75 Gearbox)

(Fort Transit MT75 gearbox)

I might be able get one from Bob, but first, I need to check if it will fit, so I need to check the dimensions of the splined part of the flange on the gearbox shaft. For that I need to remove the flange from my gearbox, but it has a very odd nut and not very accessible.


Thanks to advices from people on the forums (again!), I bought a 30mm offset ring spanner to undo this odd nut, but of course, it is too big.


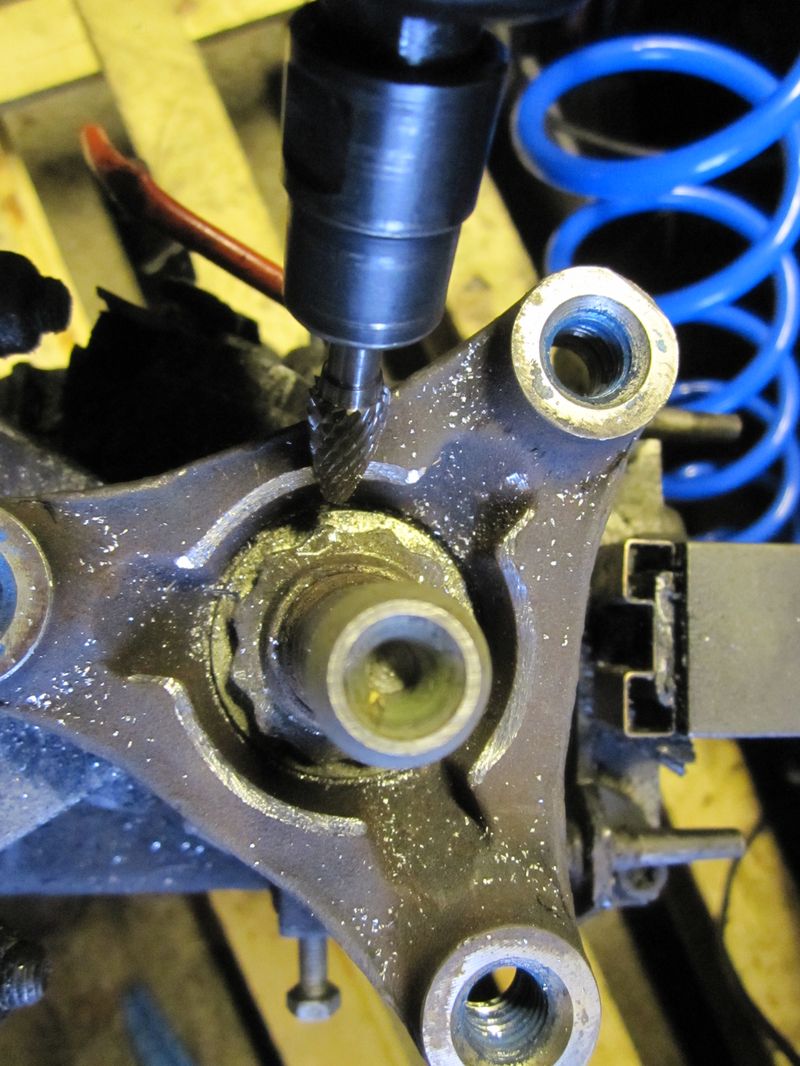
I first started to grind the flange itself, but that was not the problem.

I
 The problem was due to the shape of the spanner. So I ground it around the ring until it fits.


 Then I made a set up with a steel bar attached to the flange with the original studs to stop it to turn and clamp locking pliers to hold the ring of the spanner on the nut (as the handle of the spanner is not parallel to the ring, the spanner was always slipping on the nut which is not wide), but nor to tight. Then I hammered the spanner until it comes (and used a lot of WD40 too!)


 Finally the nut came out :-)


I pulled the flange out with an extractor. Clean and easy.


It is coming :-)


Now it is out


So here are pictures of the flange, and the last one is with the dims which will allow Bob to check if his round Ford transit flange will fit on my gearbox.


(click to enlarge)


dimanche 7 avril 2013

Bye-bye Sierra

Enfin, la personne qui voulait m'acheter ce qu'il reste de la Sierra est venu la chercher aujourd'hui.
Finally, today the person who wanted to buy what's left of the Sierra came to collect it.


Ca n'a pas été facile de la hisser sur sa remorque (une voiture sans roue ne se déplace décidement pas facilement), mais avec l'aide d'un long pied de biche et quelques planches de bois, nous y sommes arrivés.
It hasn't been easy to pull it on his trailer (a car without wheels definitely doesn't move easily), but with the help of a long crow bar and a couple of wooden boards, we managed to put it on.


J'ai vendu la caisse 500 couronnes (kr) (60 €) avec les ventilateurs du radiateur d'eau et les deux clignotants avant. A déduire du prix que je l'avais acheté, soit 1500 kr (180 €), ça veut dire que toutes les pièces que j'ai récupérées dessus m'auront en fait coûté 1000 kr (120 euros), ce qui n'est vraiment pas mal. Bon, plus tout le boulot et les heures passées sur les boulons rouillés, mais ça, ça ne compte pas ! Si ?
En la vendant, même à ce prix très bas, j'ai aussi économisé le cout de la faire enlever par un casseur professionnel, qui prend 1000 kr (120 €) pour ça ! Donc vraiment, globalement, ce fut une bonne opération.
I got 500 Kr (60 euro) for the car, the radiator fans and the two front blinkers. Do be discounted from the purchase price, 1500 Kr (180 euros), it means that I got all the parts I removed from the Sierra for 1000 kr (120 euros) which is not that bad. Well, plus all the working time and the hours spent on rusted bolts, but it doesn't count, does it?
By selling it even at this low price, I actually also saved the cost of making it collected by a professional car breaker (scrap yard) who charge 1000 kr (another 120 euros) for that! So globally, it has been a good operation.

J'ai toujours des pièces de Sierra à vendre, voir ces posts:
I still have a lot of Sierra parts for sale, please see these posts:

http://vouchtroadster.blogspot.se/2012/11/parts-ford-sierra-for-sale.html
http://vouchtroadster.blogspot.se/2012/11/parts-haynes-roadster-locost-for-sale.html

Et maintenant, quelques photos de la journée.
Now, a few pictures of this day.


Bye-bye !


samedi 6 avril 2013

Soudure plaques GM et goujons réservoir, Ponçage plaques CP10, Examination platine réservoir (Welding GM plates and fuel tank studs, grindding CP10, examination tank closure plate)

Le châssis à nouveau nu.
The chassis is bare again.


Je soude les faces inférieures des supports de boite de vitesse GM.
I weld the undersides of the gearbox mount plates GM


Je désire ensuite que les boulons qui tiennent les colliers de fixation du réservoir d'essence soient solidaires du châssis. J'ai en effet un problème avec les boulons arrière : il n'y a pas un espace suffisant entre le trou de fixation et le tube rond arrière RP1, et la tête de boulon ne passe pas, ce qui m'oblige à utiliser des entretoises (que j'avais coupées dans du Téflon, ce qui n'est pas l'idéal). Désolé, je n'ai pas de photos spécifiques de ce problème. Si je coupe les têtes et soude les vis arrière comme des goujons, je résous ce problème.
Then, I want the bolts which hold the fuel tank mounting strips to be welded on the chassis. Indeed, I have a problem with the rear bolts: there is not enough space between the mounting hole and the rear round tube RP1, and the bolt head does not fit, which obliged me to use spacers (which I cut in a Teflon rod, which is not the ideal). Ssorry, I do not have a specific photos of this problem. If I cut the heads of these rear bolts, and weld them as studs, I solve the problem.


Je commence par les boulons avant que je soude simplement par en dessous.
I start with the front bolts that I simply weld from the underside.


Je coupe la tête des boulons arrière.
I cut the head of the rear bolts.


Prêts à être soudés.
Ready to be welded.


Hum... ce ne sont pas mes meilleures soudures... Je ne suis pas super content de moi. Difficile de trouver le bon réglage sur le poste à souder entre les boulons qui fondent super vite et les plaques d'acier de 3mm.
Hum... Not the nicest welds I've done... not very happy with that. Hard to fond the right setting on the welder between the bolts which melt very quickly and the 3mm steel plates.


Mais ça tient bon, c'est juste pas joli. Un petit coup de disque à lamelles pour arranger un peu le look.
But it will be strong enough, it is just not good looking. I trim the welds with the flap disc to make them look a bit better.


Voici les goujons de fixation de réservoir une fois le châssis remis à l'endroit.
Fuel tank mounting studs once the chassis turned back the right way around.


Et le réservoir fixé. C'est maintenant bien plus facile à boulonner, et je n'ai plus besoin des entretoises.
And the fuel tank fitted. It is now much easier to bolt it on, and I no longer need the spacers.


L'autre chose que j'ai faite aujourd'hui est de poncer les cordons de soudure à l'arrière des plaques de support de différentiel CP10. En effet, les équerres de fixation de différentiel ne se montent pas parfaitement à plat à cause des cordons un peu trop épais.
Because of the welding beads at the rear of differential mounting plates CP10, the differential brackets can not be perfectly flushed mounted, so I need to grind these beads.


Puis je commence à réfléchir à l'adaptation de la pompe immergée d'origine et de la sonde de niveau d'essence. Ces photos sont plus là pour me rappeler le montage original sous différents angles qu'autre chose.
Then I start to think about how I will adapt the original in-tank fuel pump as well as the fuel level sender. The purpose of these pictures is nothing more than to remind me the original set-up under different angles.