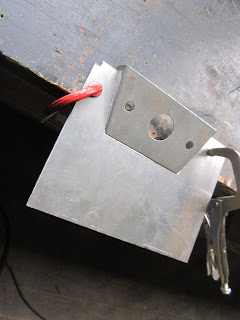
I was a bit suspicious about the ability of my welder (145A) to manage the welding of plates CP10 which are quite thick (5mm). First I ground the corner to leave room for the welding beads now joining tubes SB4/SB3 at the top, and SB4/BR12 at the bottom.
Mais je suis agréablement surpris de voir que le poste à souder gère parfaitement cette épaisseur, et je suis en fait assez content de ces soudures.
But I'm nicely surprised that my welder managed it perfectly, and I'm actually quite happy with these welds.
Les soudures ayant l'air costaudes, je décide pour l'instant de ne pas souder sur la face arrière pour ne pas gêner après coup les équerre des fixation du différentiel qui viendront se boulonner sur ces plaques CP10.
These welds looking strong enough, I decide for now not to weld on the rear face in order not to hinder the differential mounting brackets which will be bolted to these plates CP10.
J'ai aussi pris une autre option que celle su livre en ce qui concerne le support de colonne de direction. Comme pour le support du rack de direction, j'ai choisis l'option que Madis (qui m'a fourni les plaques du châssis découpées lazer) a étudiée. Le support du livre (qui se soude sur la cloison CP16, et que nous appelleront CP16a) est fait pour accueillir le coussinet d'origine de la Ford Sierra dont tout le monde dit qu'il est loin d'être idéal.
When it comes to the steering column support assembly, I also took another option than the book's one. As I did for the steering rack support assembly, I chose the option that Madis (who supplied me the laser-cut chassis plates) designed. The book's support (which is welded to the foot-well wall CP16, let's call it CP16a) is designed for the original Sierra steering bush, which is not very good according to most of the Roadster's builders who tried it.
(Détail d'un photo du livre de Chris Gibbs montrant le support CP16et le coussinet d'origine de la Sierra.)
(Detail of a picture from the Chris Gibbs' book showing CP16a and the original Sierra steering bush)
(Detail of a picture from the Chris Gibbs' book showing CP16a and the original Sierra steering bush)
Beaucoup de constructeurs mettent donc un roulement pour le passage de la colonne de direction. Madis lui a conçu une plaque CP16a un peu plus grosse pour pouvoir y monter un roulement type UCFL206 qui est un standard. Peut-être un peu gros et lourd, mais au moins, avec un tel arsenal, on est sur de son coup.
Most of the builders install a bearing on CP16a. Madis drew a bit bigger CP16a, designed to be used with a UCFL206 bearing, which is a standard. Might be a bit big and heavy, but at least, I'm sure it will do the job.
Le livre dit aussi que la cloison CP16 doit être faite dans de la tôle de 1mm d'épaisseur. Mais là pareil, il semble y avoir un consensus sur le Forum Haynes pour que cette plaque soit plutôt de 3mm d’épaisseur. En effet, les premiers constructeurs qui ont fini leur auto ont du changer cette plaque pour une plus épaisse, car, le pédalier étant boulonné dessus, la plaque de 1mm n'était pas assez rigide et se pliait sous l'éffet des freinage. Un thread sur le forum Haynes parle de ça (voir en particulier les interventions de HandyAandy à ce sujet)
http://www.haynes.co.uk/forums/showthread.php?t=7960&highlight=CP16
Madis m'avait fourni CP16 en 1mm, et je ne vais pas l'utiliser.
The book also says that CP16 wall has to be cut in 1mm thick steel plate. Here again, the general consensus looks to be that 3mm is much better for this wall. Indeed, first builders had to change the 1mm for a 3mm wall, as the pedal box is bolted to this plate, and the 1mm wall was not stiff enough, and got bent under the braking pressure. There is a thread on the Haynes Forum about this topic (read particularly the interventions of Handy Handy about that)
http://www.haynes.co.uk/forums/showthread.php?t=7960&highlight=CP16
CP16 en 1mm d'épaisseur
CP16 1mm thick
Je décide donc de découper une autre CP16 dans ma tôle d'acier de 3mm, mais de garder CP16a tel que Madis me l'a fourni.
I decide to cut another CP16 in a 3mm plate, but to keep CP16a as Madis supplied it.
Je positionne CP16a sur CP16.
I place CP16a on CP16.
Puis je les soude ensemble.
Then I weld them together.
Mais avant de souder cet ensemble sur le châssis, il faut couper la partie centrale du rail inférieur BR10 qui doit être retirée pour pouvoir, plus tard, laisser place à la boite de vitesse (détails dans le post suivant.)
But before welding this assembly on the chassis, it is needed to cut the central part of rail BR10 which has to be removed to leave room for the future installation of the gearbox (details in the next post.)
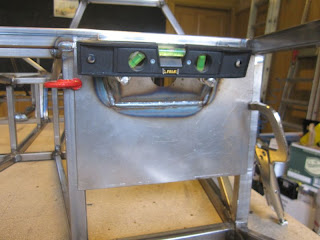
Je peux maintenant positionner CP16, au niveau à bulle pour être sur de l’horizontalité de CP16a.
I can now place CP16, the spirit level helps me to make sure CP16a is perfectly horizontal.
Puis je pointe CP16 sur le châssis.
Then I tack CP16 on the chassis.
Différentes vues
Different views.
On peut voir la colonne montée avec le palier UCFL206 dans ce post.
You can see the steering column and UCFL206 bearing fitted on CP16 in this post.
L'autre cloison côté de CP16 (CP17), n'a elle aucune fonction de rigidité, on peut donc la laisser en 1mm d'épaisseur. J'utilise celle que Madis m'a fourni.
The other wall beside CP16 (CP17) has not stiffening function, so it is OK to keep it 1mm thick. I use the one supplied by Madis.
Après quelques ajustements, je la maintient en place aux quatre coins.
After a few trimmings, I clamp it to the chassis on the 4 corners.
Et je le pointe à l'extérieur et à l'intérieur.
And I tack it inside and outside.
Vue d'ensemble du châssis après l’opération.
Overall view of the chassis after this operation.
Il me faut encore fabriquer les plaques CP15 qui sont les équerres de support de volant.
I also need to fabricate CP15 plates which are the steering wheel support brackets.
Il faut y percer 2 ouvertures ovales pour ajuster le volant en hauteur. N'ayant pas de tour, il me faut trouver un moyen de les faire juste avec la perceuse. Je décide donc de faire deux trous que je joindrai plus tard. Je trace donc les centres de ces deux trous. La ligne en pointillés montre la ligne selon laquelle la plaque sera pliée à l'équerre.
There 2 oval openings that need to be drilled in CP15 in order to be able to slightly adjust the height of the steering wheel. As I have no lathe or specific tooling for that, I need to find a way to achieve that with my driller only. I decide to drill 2 holes that I'll join later. I mark the holes centres on the plates. The discontinued line is the bending line (these plates will be bent at 90°)
Je perce les deux trous. Comme pour les autres plaques, ma perceuse à colonne étant des plus imprécise, je commence petit pour être bien centré, et j'agrandis les trous en 3 ou 4 étapes jusqu'au diamètre final : 13mm.
I drill the two holes. Same problem as for the other plates: my drill press is so not accurate that I don't trust it, and I start drilling small holes to be correctly centred and I increase the diameter step by step until the final diameter: 13mm.
Je les joins à la scie sauteuse pour faire l'oval.
And I joint them with the jig-saw to get the oval shape.
Je meule à la fraiseuse pneumatique pour lisser le tout.
I grind the edges with the air-driven portable milling machine to make them smooth.
Puis je plie les plaques à l'ancienne : étau et marteau !
The I bend the plates old fashion way: vise and hammer!
Les 2 plaques CP15 terminées.
CP15 are now finished.
Comme je viens juste de recevoir ma colonne de direction de Sierra (sur la table sur la photo), je peux prendre les mesures de l'entraxe de fixation.
As I just received my Sierra steering column (on the table on the picture), I can take the right measurements of CP15's spacing and position.
Je positionne correctement les équerres CP15 et les maintiens en place.
Then I correctly place CP15 brackets and clamp the in place.
Puis je les soude directement.
And I directly weld them.
On peut voir la colonne montée sur CP15 à la fin de ce post.
You can see the steering column fitted on CP15 at the very end of this post.


Aucun commentaire:
Enregistrer un commentaire